Mending resource: Parachute rangers stitch
Allow us to introduce a new concept on the blog; our Mending Resources!
After the release of our mending book we have had several requests for step-by-step instructions for the projects in it, and since we have a little more time on our hands now than we usually do we thought we'd give it a shot!
We call this technique the Parachute rangers stitch, but it has many other names aswell. It is used all over the world to keep cloth edges together and its a strong, easy stitch that we learnt about from our friend Johannes, who actually is a second lieutenant parachute ranger in the Swedish army. When we told him the we were writing the mending book he insisted on showing us this technique, which he learned during his training!
The function of this stitch is to close up the edges of a slit without them overlapping, which would in fact make the garment smaller. Use it to close up tears and cuts in fabrics that are otherwise strong. If you have a garment that is worn until thin and then torn at the thinnest point this however is not the technique to go with! A parachute rangers stitch made on such a cloth will rip out pretty fast, because the fabric around the slit is also very weak. We'll show you what to do for your thin and ripped jeans later on.
.
You will need a pair of scissors, a needle and thread.
:
 .
.When sewing by hand a basic rule of thumb is to use a thread that is no longer than your own arm.
 .
.
Start out by threading a needle and tying a small knot on the other end of the thread.
.
 .
.
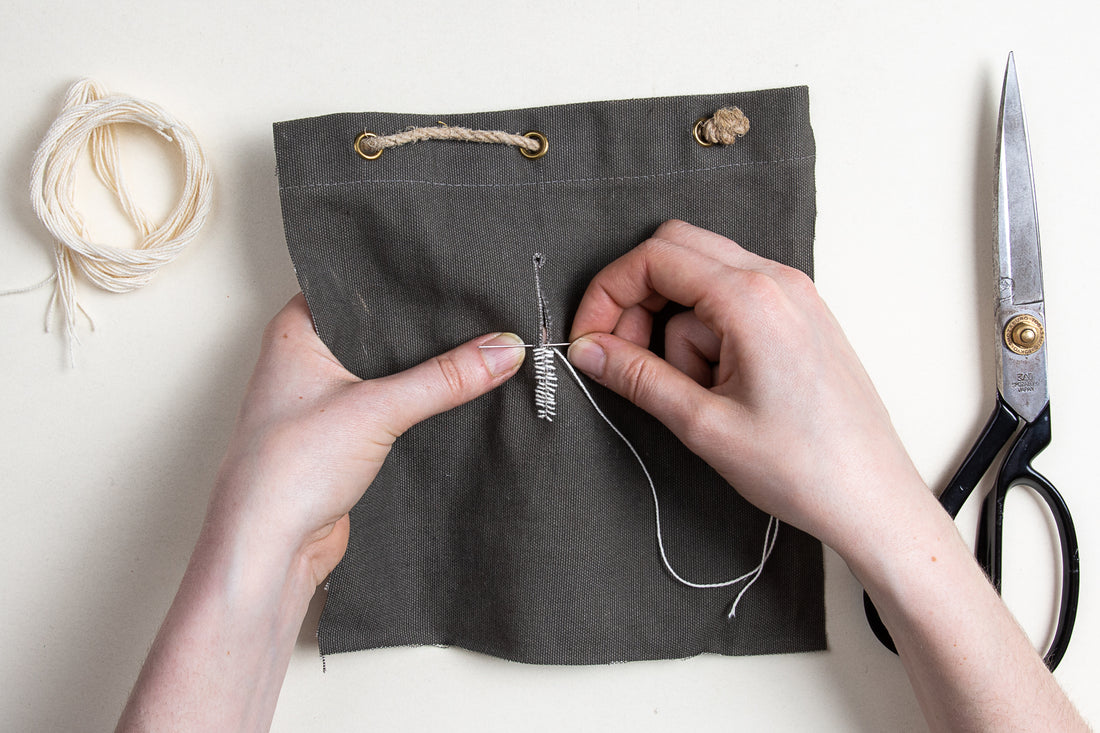
Start by inserting the needle at the bottom of the slit and bring it up through the fabric about 4-5 millimeters away from the slit.
.
.
The next step is to bring the needle into the slit again, and then bring it up4-5 millimeters away from the slit on the other side.
.
 .
.Pull lightly to close the slit. You dont need to pull as hard as you can, just give it a good little tug and that will be fine.
.

.
Continue in the same way! The needle goes into the slit, and then up on alternating sides...
.
 .
.
...And after a while a nice little row of stitches has formed!
.
.
At the end of the slit I brought the needle down on the backside and there I fastened the thread by sewing a little loop which created a knot, but we forgot to take a picture of that. Guess Ill have to describe it later!
The mend is quite strong and according to our friend Johannes the ranger cadets have to make the join so tight that no light can be seen through the former slit.
.
 .
.
Do you have a hard time finding mending materials that suit your taste? We have decided to share our stash with menders in need! Have a look at the kit here.
.
3 comments
Sorry Dominic. I just realized that the kits are sold out at the moment but we will be working on getting some more ones up online shortly.
Hi Dominic! Yes we do, unfortunately the link wont work when we refresh the product on our web site but you can find it by searching for “Mending kit” on our web shop :)
Do you still carry the mending kit? Got a 404 error when I tried to click on the link above.